
Today a router is being used to connect with multiple devices at once. Obviously, this is impossible if all established connections meet up at a single port on your router. If you wish to set up a Frontier router to multiple devices like your home camera system or PC or any incoming connections, port forwarding is necessary.
Having separate ports allows your devices to remain unaffected and relieves internet connections without delaying the stream. If port forwarding is done correctly, you will create a virtual server for your extended port. This guide is all about how you can successfully establish Frontier port forwarding requirements in a Frontier router.
Table of Contents
How To Do Frontier Port Forwarding In Router?
Step 1: Log in to the Router
1. The first thing that you need to login into your Frontier router. To do this, you will have to connect with your router and then open up a web browser.
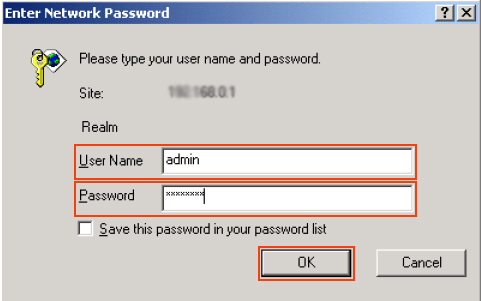
2. You can now enter your IP address as your default login URL. This will redirect you to the admin panel. You can now enter your default user id and the Frontier password to login into the router and start working.
3. The next thing you need to do is look for the model number of your Frontier router. If you already know the router model number and the ports, you won’t have to seek further at all.
Step 2: Frontier Port Forwarding
1. Once you are into the admin panel of your Frontier router, you will have to give a tap on the firewall option. Once you do this, a set of new pages will open p in front of you. You can now give a tap on the port forwarding menu.
2. Now you will have to make the configuration changes. Once you open up this page, you will have to select the custom application mode available here. You can now rename the program to ensure the reason for port forwarding.
3. You will be able to choose from the protocol list by dropping down the menu. There are basically two options to choose from. Either you choose from a Global Start port, or you go for an end port.
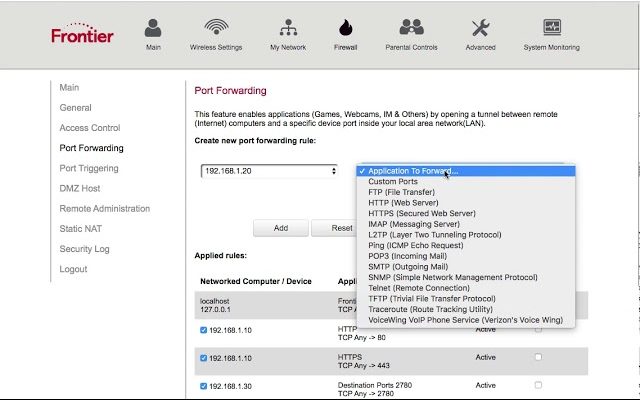
4. Next up, you’ll be able to see the local base port present. Here you will have to enter the port numbers and other important information as available.
5. You can use the select drive option mentioned here. The next thing that you would do is to select the device from the menu drop list available. You can also enter the IP address manually if you do not have every detail.
6. Once done with this, you will be able to add rules and apply the settings. Your configuration is now complete, and you will be able to use the port forwarding feature from the Frontier router.
How To Set Up Advanced Port Forwarding?
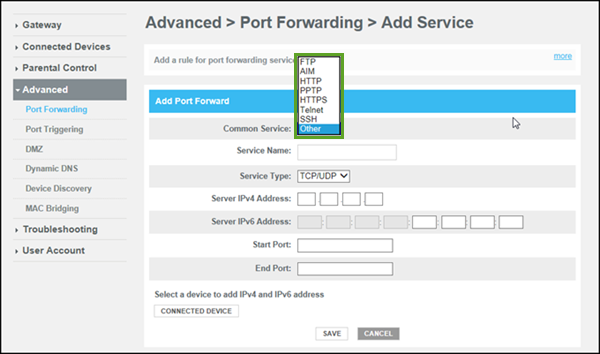
Step 1:
To do the advanced configurations, you need to first know about the available ports in the router. Now, you can quickly open your browser and download the AppConfigLocal.xml file.
Step 2:
Next up, you need to move the AppConfigLocal.xml to your game’s installation folder or the device you will use.
Step 3:
You can now open up the file again from your PC in a Notepad format. Here you will see the option of edit port. Edit this port and place a new number.
Step 4:
You are done with changing the port number. You can now save and close the file and then restart your PC.
Frequently Asked Questions [FAQs]
Q1. Is it possible to Port Forward on Frontier FiOS?
A1. Yes, it is. You will have to know how to do port forwarding perfectly and without any delay at all. But the one thing that you must take care of is the availability of ports on your router. Most people do go for port 80 as it is always empty and helpful as well.
Q2. Can I do port forwarding for CGNAT ISP?
A2. The possible option for you to do is to get a public IP address. If not, you can also go over to take the help of a VPN. Using VPN will help you to quickly set up and configure port forwarding requirements in a flash. It takes very little time to set up as well.
Q3. How to set up Minecraft port forwarding in Java?
A3. A lot of people have faced the same issue while working with Minecraft port forwarding. Usually, this problem happens when you have an Antivirus. You can try to disable the Firewall and Antivirus for a moment and then bypass the Minecraft port forwarding requirements.
Conclusion
Frontier Port forwarding is a simple and accurate process. However, before you start to port forward, you must ensure that you get every minute detail about which port is free to access. Doing it on an already occupied port will not help you to get the best results.
Always give a name to your port forwarding connections to ensure that you get proper access to the device you are connecting with the Frontier router. If you cannot do this, remove all established connections and then configure the port forwarding process again.